Wednesday, February 27, 2013

A Spring Wreath for Woman's Day Magazine

Making Wreaths


During my career as a crafter, I've designed and published hundreds of wreaths, but none quite as unusual as the paper cupcake liner wreath I designed for the March 2013 Issue of Woman's Day Magazine.


Last October  I received a call from my good friend and Deputy Editor of Woman's Day magazine, Sara Lyle. She asked that I redesign 2 wreaths for the Woman's Day spring issue that she discovered on the web which were designed by 2 talented bloggers.  Sara also asked that I design a third wreath.

My Assignment: 
1- Design a wreath which is different in style from the 2 they had already chosen.
2- Make it easy to create.
3- Materials should be inexpensive.

After sending 5 sketches to Sara at Woman's Day the editors chose  the easy-to-make paper cupcake liner wreath you see above.

 Here are the quick and easy 'how-to' instructions:
Choose approximately 500 cupcake liners in colors of your choice.

Fold each individual paper liner in half and then into thirds, ruffling the folds.
Use floral greening pins to attach the folded paper liners to the wreath. Pin each close together to create the ruffled appearance covering a 17" Styrofoam wreath.

Happy Crafting

Look for the new March Issue of Woman's Day magazine to see the entire feature and other wreath projects designed by crafters Trenna Travis and James Farmer.  Thank you, Sara Lyle, for another great opportunity to work with you!


Wednesday, February 20, 2013

Before & After - Create This Hip look With Painted Windsor Chairs


Looking for a fresh look?
Color can be a major game-changer for your home.

The photos below may appear familiar to you for they first appeared in the February issue of Better Homes and Gardens magazine.  I produced and styled this feature along with Connecticut interior designer, Ann Rae. Ann applies color in unique ways.  The blue color she used on her home's front door is an inviting and fun eye-catching element which suggests the extraordinary use of color to be found once inside her home!


Interior Designer Ann Rae in front of her home in Connecticut.

It was the door color above that inspired us to do something really fun to spice up Ann's kitchen. Although we loved Ann's kitchen before the shoot, the room lacked the color that Ann had used so creatively throughout her home.  Inspired by Ann's color sense, we decided to rev up the color in the kitchen by bringing in new chairs for her fabulous table.

Style Idea: Add Painted Chairs
First, we went to the Warren, Rhode Island based O&G Studio to purchase their fabulous and colorful Fox Point Windsor Chairs in this vibrant finish (below). Unfortunately, the chair wasn't available for our shoot.  http://www.oandgstudio.com

Solution: Let's Make The Chairs Ourselves
I shopped for 4 mismatched Windsor style chairs and found them at thrift, consignment and junk shops. The day before the photo-shoot my assistant, Monica and I went to work in Ann's garage to paint the chairs.

Before...

... and After!

I love the idea of mismatched chairs at a table.  We added two of Ann's antique wooden Windsors into the mix. The strong blue color of her chairs are the unifying factor which makes it all work. Ann added the rug which visually anchors the table to the floor.

Day-To-Day Styling 
I found the blue vase (above) at a local shop and then added a floral arrangement which we made from Ann's garden.

Styling tip
Create a strong and colorful focal-point by adding a unique element such as the vase seen in the photo above. Change the appearance weekly with a different variety of fresh flowers.


It's Amazing What A Fresh Coat Of Paint Can do!

Tuesday, February 5, 2013

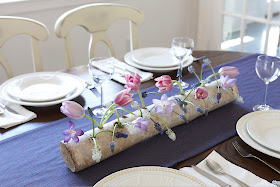
Winter Log Centerpiece


Have The Winter Blues? Get Flowers! Part 2

A dding to last weeks post I decided I had to share another floral project that I created for the Good Housekeeping magazine feature.

With spring approaching crocuses, tulips and grape hyacinths making their debut not only in the garden but even sooner in small pots in supermarkets and garden centers.

Birch log centerpiece
So here's an idea for creating a small garden centerpiece using these tiny gems of spring.

PERECT FOR A PARTY!   This is the kind of project that needs some planning ahead, but it's not complicated. If your having a party, it would be worth scheduling some time to make this as your centerpiece. 
This is important! You need to be handy and very careful with a drill to make the holes on top for this project.  If you're not, Even easier, take the log to your local lumber yard or a carpenter and pay a pro to drill the holes for you!  It will take them no time at all.

How to make this centerpiece! 

Materials
A birch log, a size that will fit comfortably on a table. 
A drill aand a 1/2 inch drill bit 
1 block of wet floral foam
Pots of Hyacinths, crocus and tulips to cut flower heads, (available in supermarkets 
in February).  The key to this arrangment is picking these flowers that have thin stems that will fit in the drilled holes.

Prepare log 
Lay log where it naturally will sit with out rolling. 

Holding log firmly, drill 1/2" wide holes, 1" deep.  I drilled the holes 
( well my husband did!)  in an alternating pattern to give the design some depth.
How to make a centerpiece
A few hours before the party, soak the floral foam in water, then fill each hole with a small plug of wet floral foam you cut with a small sharp knife. Cut your flowers with short stems ( 2-3") and push the ends into the plugs of foam.

Add  small amount of water each morning to holes to keep flowers refreshed. Voila, a centerpiece everyone will be charmed by!