lidbeckbrent

lidbeckbrent

Wednesday, February 27, 2013

A Spring Wreath for Woman's Day Magazine

Making Wreaths


During my career as a crafter, I've designed and published hundreds of wreaths, but none quite as unusual as the paper cupcake liner wreath I designed for the March 2013 Issue of Woman's Day Magazine.


Last October  I received a call from my good friend and Deputy Editor of Woman's Day magazine, Sara Lyle. She asked that I redesign 2 wreaths for the Woman's Day spring issue that she discovered on the web which were designed by 2 talented bloggers.  Sara also asked that I design a third wreath.

My Assignment: 
1- Design a wreath which is different in style from the 2 they had already chosen.
2- Make it easy to create.
3- Materials should be inexpensive.

After sending 5 sketches to Sara at Woman's Day the editors chose  the easy-to-make paper cupcake liner wreath you see above.

 Here are the quick and easy 'how-to' instructions:
Choose approximately 500 cupcake liners in colors of your choice.

Fold each individual paper liner in half and then into thirds, ruffling the folds.
Use floral greening pins to attach the folded paper liners to the wreath. Pin each close together to create the ruffled appearance covering a 17" Styrofoam wreath.

Happy Crafting

Look for the new March Issue of Woman's Day magazine to see the entire feature and other wreath projects designed by crafters Trenna Travis and James Farmer.  Thank you, Sara Lyle, for another great opportunity to work with you!


Wednesday, February 20, 2013

Before & After - Create This Hip look With Painted Windsor Chairs


Looking for a fresh look?
Color can be a major game-changer for your home.

The photos below may appear familiar to you for they first appeared in the February issue of Better Homes and Gardens magazine.  I produced and styled this feature along with Connecticut interior designer, Ann Rae. Ann applies color in unique ways.  The blue color she used on her home's front door is an inviting and fun eye-catching element which suggests the extraordinary use of color to be found once inside her home!


Interior Designer Ann Rae in front of her home in Connecticut.

It was the door color above that inspired us to do something really fun to spice up Ann's kitchen. Although we loved Ann's kitchen before the shoot, the room lacked the color that Ann had used so creatively throughout her home.  Inspired by Ann's color sense, we decided to rev up the color in the kitchen by bringing in new chairs for her fabulous table.

Style Idea: Add Painted Chairs
First, we went to the Warren, Rhode Island based O&G Studio to purchase their fabulous and colorful Fox Point Windsor Chairs in this vibrant finish (below). Unfortunately, the chair wasn't available for our shoot.  http://www.oandgstudio.com

Solution: Let's Make The Chairs Ourselves
I shopped for 4 mismatched Windsor style chairs and found them at thrift, consignment and junk shops. The day before the photo-shoot my assistant, Monica and I went to work in Ann's garage to paint the chairs.

Before...

... and After!

I love the idea of mismatched chairs at a table.  We added two of Ann's antique wooden Windsors into the mix. The strong blue color of her chairs are the unifying factor which makes it all work. Ann added the rug which visually anchors the table to the floor.

Day-To-Day Styling 
I found the blue vase (above) at a local shop and then added a floral arrangement which we made from Ann's garden.

Styling tip
Create a strong and colorful focal-point by adding a unique element such as the vase seen in the photo above. Change the appearance weekly with a different variety of fresh flowers.


It's Amazing What A Fresh Coat Of Paint Can do!

Tuesday, February 5, 2013

Winter Log Centerpiece


Have The Winter Blues? Get Flowers! Part 2

A dding to last weeks post I decided I had to share another floral project that I created for the Good Housekeeping magazine feature.

With spring approaching crocuses, tulips and grape hyacinths making their debut not only in the garden but even sooner in small pots in supermarkets and garden centers.

Birch log centerpiece
So here's an idea for creating a small garden centerpiece using these tiny gems of spring.

PERECT FOR A PARTY!   This is the kind of project that needs some planning ahead, but it's not complicated. If your having a party, it would be worth scheduling some time to make this as your centerpiece. 
This is important! You need to be handy and very careful with a drill to make the holes on top for this project.  If you're not, Even easier, take the log to your local lumber yard or a carpenter and pay a pro to drill the holes for you!  It will take them no time at all.

How to make this centerpiece! 

Materials
A birch log, a size that will fit comfortably on a table. 
A drill aand a 1/2 inch drill bit 
1 block of wet floral foam
Pots of Hyacinths, crocus and tulips to cut flower heads, (available in supermarkets 
in February).  The key to this arrangment is picking these flowers that have thin stems that will fit in the drilled holes.

Prepare log 
Lay log where it naturally will sit with out rolling. 

Holding log firmly, drill 1/2" wide holes, 1" deep.  I drilled the holes 
( well my husband did!)  in an alternating pattern to give the design some depth.
How to make a centerpiece
A few hours before the party, soak the floral foam in water, then fill each hole with a small plug of wet floral foam you cut with a small sharp knife. Cut your flowers with short stems ( 2-3") and push the ends into the plugs of foam.

Add  small amount of water each morning to holes to keep flowers refreshed. Voila, a centerpiece everyone will be charmed by! 


Tuesday, January 29, 2013

Styling a Winter White Floral Arrangement for Good Housekeeping


Have The Winter Blues? Get Flowers!


A few years ago Good Housekeeping Magazine asked me to design 5 cheery floral arrangements for their winter issue.  Flowers invoke warmth and happiness which we all could use a large dose of during the chilly and grey month of January. 

    January 2010 “Winter arrangments” by Karin Lidbeck,  Photo by Michael Partenio

Grab a can of white and soft blue multipurpose spray paint: An effect of winter grey is created with a light dusting of white sprayed over lotus pods, dried eucyluptus and bare branches.  My favorite design was inspired by winter colors of frosty grey blues and snowy whites.  I combined white tulips and hyacinths, eucyluptus branches, lotus pods and bare branches and then provided a few tricks by using Krylon spray paints.

Frost the vase: Cover a plain and inexpensive clear glass vase with newspaper leaving a hole for the opening. I used a can of mulitpurpose mountain-view Krylon spray paint.

Hold the nozzle about 8" above the vase.  While pointing the spray-nozzel inside of the vase, spray for two quick seconds to dust the entire internal sides of the glass. Let dry and dust again two more times.  If the paint coat is too heavy, it will run. If this happens don't dispair because this too will have a pretty effect. The end result should yield a translucent 'frosting' of paint.


Wednesday, January 16, 2013

Getting Organized: Designing A Mudroom For BH&G


Organizing space is on everyone's mind during winter months. Providing places to neatly store winter coats, boots, shoes, hats, gloves and school gear is always a challenge. In many homes, the space for an elaborate mudroom is simply not available.

For many of us, an elaborate mudroom may not be affordable and so, my challenge was to design an organization center that could be built in almost any home and on a small budget.

Two years ago Better Homes and Gardens magazine asked me to design a mudroom space that would be easy and affordable to make. With just a little building knowledge, you can make one too!
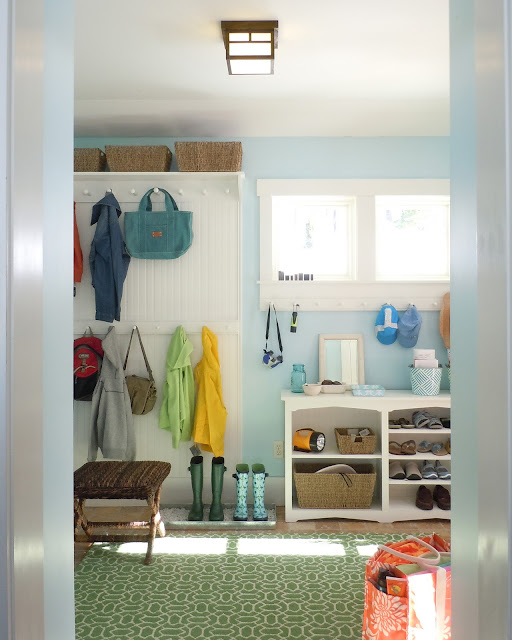
Better Homes and Gardens mudroom

For the additional bookcase design that I had in mind, I first needed to find a home with an entry area that included some unused wall space. My good friend, Joanne Palmisano of Salvage Secrets, came to my rescue. I explained to her that my assignment was to create a mudroom from an under-utilized entryway. Without a moments hesitation, Joanne said, "Use mine!" That's one of the reasons I love her!

Joanne lives 5 hours away but that didn't matter. Her home is my home-away-from-home, and so, off I went! I'm always happy to work with Joanne.

Are You Ready? You Can Do This!

Easy mudroom additions
We started with a 4' X 8' sheet of bead board purchased at Home Depot. It was mounted directly to the wall using wood screws which are drilled through the board and into the wall's studs which is behind the sheet rock.


To give the edges of the bead board a 'finished' appearance, we added trim moulding. Cut the moulding to the same height as the board. Then use caulking glue to adhere the trim.


Press the trim to the wall and against the bead board to cover the raw edge.

I found a company in Texas that makes pegged shelves:  Peg and Rail can be custom made to any length and then painted in a variety of colors.


Its a good idea to have two pairs of hands when creating this project. Joanne held the shelf in place while her husband, Steve, screwed the board into the 2" X 4" studs behind the sheet-rocked wall.


Be sure you know were the studs are before you start. Mark them on the wall above the bead board for guidance.


As you can see in the photo above, we added a second row of pegs across the middle of the bead board and another row under the window. You can never have too many pegs.

OK, we're almost done! To create more storage space, I added a small bookshelf under the window. The bookshelf came from Knock On Wood Unpainted Furniture. I used an Alder Mackenzie bookcase which is 38.5" W X 29" H

Bravo Joanne and Steve Palmisano. I could not have done it with out you!!

Dressing Up Your New space.


The bookshelf is conveniently placed as an entry table and for storing shoes on the shelves below.

Once the new room was done, styling the mudroom was icing on the cake. To set the stage for photography, I brought in boxes and boxes of props provided by my favorite vendors. BH&G Editor, Amy Panos, then arrived from Des Moine, Iowa and we spent a day shooting the our completed Mudroom story.

You can get the full story with additional step-by-step instructions by clicking: http://www.bhg.com/decorating/storage/mudroom/how-to-make-a-peg-wall/#page=1

- Rug from: Company C
- Little Bench from: The Pottery Barn
- Baskets from: Home Goods
- Boots, jacket, bags and binoculars from: LL Bean and Garnet hill
- Decorative Pails and storage caddies from: http://themacbethcollection.com/shop.shtml

Thursday, January 10, 2013

A Winter Project- Creating A Moss Garden

Container Gardening: 
Have you ever made a moss garden?  
Moss gardens are low maintenence miniature gardens of wonderfully textured greenery. They can be a great indoor gardening project for you. 

 I  had no idea gardening could be so simple and so much fun! This past fall I was hired by Better Homes And Gradens to style and produce their moss garden feature. It was an exciting opportunity to work with floral designer and garden expert Tara Heibel of Sprout Home.  Her garden center and floral design shops are located in Brooklyn, NY and Chicago, IL.

Tara taught me just how easy it is to create a low maintenence indoor garden.

Last September Tara arrived at my home with a car load of beautiful plants and fun ideas. Soon after, our photographer, Michael Partenio arrived while Tara unpacked a huge varitey of mosses and as I prepared and created the photography set for BHG.

We spent the day producing this beautiful feature which is presented in the January, 2013  issue of Better Homes And Gardens.

With just a small amount of soil in the bottom of a contianer, place several types of mosses together to create a mini landscape. The idea is to create textural greenery by choosing a variety of moss types.  

After watering thoroughly, the micro-landscape requires little else other than adequate light. Simply mist dailey to keep your moss garden flourishing. You can find a wide variety of mosses by simply walking around your outdoor garden and yard. Use a spade to gently cut and lift out slices of moss along with a layer of supporting dirt.  You can also purchase a variety of mosses at Sprout Home.com or your local garden center and craft shop. 

You can read the entire article in the January, 2013 issue of Better Homes And Gardens

                                            _____________*____________

For more info about moss gardens and Tara's designs, please click: www.sprouthome.com 

Phone: (312) 226-5950 

email: http://www.sprouthome.com/contact/

You can purchase a subscription to the BHG iPad digital editon 
by clicking here: Sign Me Up! 

Wednesday, January 2, 2013

New England Homes Magazine: Styling in 2012


With every New England Home story, the work of the most talented architects, interior designers, builders and craftspeople in the region is brought to life. This New Years Day, I proudly reflect back on some of the wonderful projects I've had the good fortune to style in our region. The following homes are among my favorite stories from 2012, each bringing a different look to the magazine.
winding staircase
Photo by John Gould Bessler
#ART

The art, New York Drippings, a stunning twenty-seven-foot multi-panel painting by Venezuelan artist Sigfredo Chacón in this home's entry is part of the modern Latin art collection that is showcased in dramatic ways throughout this home of classic architecture, appearing in our New England Home Connecticut summer issue
Photo by Jim Westphalen
It was well worth the five-hour drive to find this well-designed timber-frame mountain home. The home’s dramatic style mirrors the breathtaking mountainside slopes. I was thrilled to find this home and work with Interior designer Jennifer Palumbo for our November/December issue.
Photo by Eric Roth, Styled by Karin Lidbeck Brent
Photo by Eric Roth
This early-1900s summer cabin restored to new splendor was a huge and exciting surprise. Sitting on the beach-y coast of Buzzards Bay, Cape Cod, we decided to feature it in our September/October issue. The home’s wood paneling mixed with a modern design creates a very successful marriage of a bygone era and today’s forward vision.
Photo by Jim Westphalen, Styled by Karin Lidbeck
Photo by Jim Westphalen
Styled by Karin Lidbeck
Photo by Jim Westphalen
In the most unlikely of places, I discovered a concrete house hidden along the Connecticut River in New Hampshire. Inspired by the designs of renowned Japanese architect Tadao Ando, the home combines concrete and glass to create a modern look. The home captivates views inside and out and is included this year's May/June issue.
New England Home Magazine feature
Photo by Michael Partenio
While touring projects with Lewis Interiors, I found this extraordinary, stately and glamorous Beacon Hill condominium, featured in the March/April issue. It reminded me that tradition thrives abundantly in the city of Boston.
Styled by Karin Lidbek
Photo by Laura Moss
One day last spring, in a quiet Connecticut neighborhood of historic and antique homes, I visited this avant garde and forward-thinking renovation of a 1960's contemporary, which I styled for the fall issue of New England Home Connecticut.
New England Home magazine
Photo by John Gruen
This family-friendly lakeside home was designed with children in mind. This room, from the September/October issue, gets my best kids’ workspace award combining ship-lap siding and vaulted ceilings to create a bright modern workspace.
Best patio 2012
Photo by Miki Duisterhoff
Lastly, this spectacular seaside home offers breakfast with a picture-perfect view! This photo graced the cover of our July/August issue.
My New Years 'Scouting' Resolution for 2013? Get more, innovative, diverse and beautiful home projects within New England!
If you have home designs that you would like to share, please send them my way. We would love to hear from you.
___________________________

For the complete article, click here.