lidbeckbrent

lidbeckbrent

Thursday, September 27, 2012

Fall Tailgate Party | Better Homes and Gardens Oct Issue

"There is so much to love about Fall:  Pumpkins, chrysanthemums, the leaves changing color, AND football!

Last October,  Better Homes and Gardens editor Amy Panos asked me to create a fall entertaining feature for their 2012 October issue magazine issue.

I grew up in a house where fall football parties and tailgating were a big part of the fall season. These memories inspired me to come up with this twist on the tailgate party idea: "How to Have A Tailgate Party Inside" 

Amy Panos and the editorial team approved my idea, and last November I put my design ideas into action.  Working closely with Amy together  we embraced what BHG always offers its readers:  Taking creative ideas and turning these ideas into fun things anyone can do that are easy, affordable and fresh.

Tailgate party with blankets

Plaid Blankets and tailgating go hand in hand.  We got the look using a blanket as a table cover.
One of my favorite blanket stores is Sorcha in Hingham, Massachusetts! Just love her amazing bright colored throws and scarfs. Perfect for this feature! 


The scarf was perfect for hanging the chrysanthemum party wreath!  Easy to make, too! Just use a mix  of big spider mums and football mums.  Cut the stems to 1" length, and push into a styrofam base. Easy as pie! (Added bonus, the mums will last without water for days!)


Perfect for any Fall party: 

Sugar cookies cut with fall leaf cookie cutters make the best leaf cookies!!! 
Use colored sprinkles from the food craft section of any grocery or cook shop. 


The football field table cover brings the game inside!  You can pull it all together easily with Craft paper, white electrical tape from the hardware store and craft store adhesive numbers .


Whoopie Pies in Footballs

These mini football whoopie pies are made using boxed pumpkin bread mix in egg shaped muffin pans and cool whip for the icing.  
Check out the current October Better Homes and Gardens magazine for the whole story and  get more inspirations for your own football gathering.

 Styling by Karin Lidbeck, Photos by Dana Gallagher

More blankets from Sorcha. check out their website you'll love her products


Wednesday, September 12, 2012

How to Make a Dahlia Centerpiece for Your Table

August and September is Dahlia flower season.  Dahlias are my favorite late summer flower!!

If you're looking for a pretty centerpiece to make for your fall party look no further this idea. I created this with a selection of dahlias from my own garden.

I cut the stems short to float the flower heads in water in a shallow container like this straight sided copper tray.

Add a few floating candles, and you now have the perfect Fall centerpiece for your table. Easy!

table setting dahlia
Designed by Karin Lidbeck for Outdoor Ideas Magazine - photo by Andre Baronowski

arrangement, tablesetting


Tuesday, August 21, 2012

Styling With Hydrangeas

Yes, hydrangeas are a year-round flower, but none of the green house grown varieties compare to the summer hydrangeas that are blooming abundantly in summer gardens now.  For stylists or anyone who love to bring flowers inside they are a quick fix for obtaining the "WOW" factor fast.

You simply cannot fail! Whether you use one, or one dozen blooms, they look amazing in any container.


This single bloom placed inside a small glass pot is surrounded with small shards of birch bark fastened with some household twine.


When I designed a hydrangea feature for Country Gardens magazine, I wanted to create a woodland style arrangement using a mix of hydrangeas and summer perennials. To achieve this rustic look,
 I designed this DIY vase from grapevine wreaths. This makes a large, rather impressive bouquet.


To Make this: Stack five, 16” grapevine wreaths on top of one another. Secure them together by pushing wood shish kabob spears through the sides of all 6 wreaths.  Place a tall glass vase inside and add flowers.


This vintage sieve holds blushing bride hydrangeas and pears, and was my solution for a summer party centerpiece.  Place a glass hurricane in the center of the sieve, and fill the container to just below the top with wet oasis.  Add hydrangea, pears and the candle.


All photos by Matthew Benson and designs by Karin Lidbeck. 

Tuesday, July 17, 2012

Making a Summer Canopy - Using Milk Jugs and....

A while back I had a collection of old milk jugs in my garage. They had such a great look and history to them. Even though I could not figure out a way to salvage them, I could not stand the idea of getting rid of them.  I just needed time and I knew eventually an idea would click!

When I got a call from Good Housekeeping magazine asking me to design some fun summer DIY projects, I knew I had to use them in some way.  It was a blistering, hot summer day when I was working on the project ideas, so naturally the thought of a shady place came to mind.  A shady place; I had finally thought of a great solution to put the milk jugs to use!


Make a Garden Canopy

Milk containers, summer day
What you will need:

Sunbrella or outdoor waterproof fabric (buy the width of the fabric x desired length.)
Ours is 72" long.  Once you have all of the pieces this project is easy to put together.
(4) large size grommets and grommet kit * fabric stores like Joanne Fabrics
(4) closet poles cut to 72 inches
(4) vintage milk  jug containers  (flea market item, junk shop or at second hand shops)
(4) 40 Lb. bags of sand
(4) plastic 8" garden pots  ( you will find these at the garden center, these are the pots you buy your plants in at the nursery)
(4) large size T cup hooks  
(4) tent stakes
Twine

At each corner of your fabric add one grommet. 1" down from top of each closet pole screw in one T cup hook. The T cup hook will hold fabric in place at grommet.

The garden pot will help hold the closet pole in the milk container. The garden pot should fit snugly into the top of the milk jug container. Before placing inside you will need to cut a hole the exact diameter of the closet pole in the bottom center of the pot. When the pole stands upright in the container it will slide through this hole and be centered in the milk jug.

First stand pole in milk jug so it is vertical and centered. Pour sand into milk jug and around the pole.  The sand will give the jug extra weight and help hold the pole in place. Place the garden pot over the pole and slide down into place inside the top of the jug. 

Place all of the jugs the correct distance apart for fabric canopy. Make sure all of the T cup hooks are facing inwards. Hook the fabric to T cup hooks.

Staking canopy: At the top of each pole, wrap and tie one end of the twine (about 8').  Use the cup hook to anchor.  At the opposite end of the twine, attach the tent stakes.  Push the stakes into the ground pulling to hold the closet poles straight and the canopy taut.

Milk containers, tent


Thursday, July 12, 2012

Salvaging Flea Market Finds

If you are flea market junkie like I am, finding a purpose for all the junk you must have can be difficult task.  It’s easier to justify buying old collectibles like vintage rakes, birdhouses, and shutters when they can be recycled into a useful or decorative object.

Here are three ways I salvaged some fun finds from the Elephants Trunk flea market in New Milford, Connecticut:


Antique Wooden Rake Peg Rack

Elephants Trunk, New Milford, CT

An old wood garden rake can have a new life and purpose as a peg rack.  Old garden rakes can easily be found at flea markets or a second hand shop. The key to this project is to make sure the claws are positioned at a 90 degree angle.  This is an attractive clever way to hang items you need close by, like the dog’s leash or your raincoat!


Bird Cage Hurricanes
Good Housekeeping

Bird cages make fun decorative displays for candles. To create a festive table for a dinner party, gather a few cages and center them on your buffet or dinner table. Fill them with multiple heights of pillar candles to create a luminous, shimmering centerpiece.   

Around the base of each cage, add a few vines from the garden and let them trail along the table top.


Shutter Table
Upcycle shutter, shutter table

Who knew that old wooden shutters could be recycled so simply into the perfect outdoor summer table? Whatever your preferred finish may be, you can prepare your shutters by sanding, painting or staining them. Just make sure all four of your shutters are the same size.

The top and bottom of the shutter table is made from art stretchers. This is a creative, easy way to make a square top. The glass easily rests on the top inside the beveled edge.

What you will need:

4 shutters
8 art canvas stretchers  
16 screws
1 piece of glass for table top- cut to fit inside beveled edge of canvas frame

Stand all four shutters as you want them to stand as table bottom. The four shutters will make a square base.  Measure the distance from the outside of one shutter across to the outside of the other. Take that measurement and purchase art stretchers for the same or slightly larger measurement. (The stretcher measurement can be slightly larger, it just means the top will extend beyond the sides a small bit.)

The stretchers, when pieced together, will form a square frame.

Stand the shutters up vertically and place the frame on top of the four shutters.  Drill two screws evenly spaced through the frame on one side and into the top edge of the shutter to hold firm. Continue on all four sides. Turn the shutter over and do the same on the bottom.

Finish the wood stretchers with the same paint or stain as the shutter. You can have glass cut at a glass store.  Measure for a piece of 1 /4"glass that will fit inside the beveled edge of the frame.


All three projects appeared in Good Housekeeping magazine June 2011, photography by Michael Partenio

Tuesday, July 3, 2012

Last Minute Tips for a Stylish 4th of July!


Some of the styling tricks I used for Better Homes and Gardens "Glory Days" feature. The magazine features an outstanding 4th of July tips for a super fun celebration.


#4thofJuly table setting summer flags

Oil hurricane lamps, red ticking runner and 12 yards of 3/8" roping makes a stunning centerpiece!


Fourth of July napkin holder, flag

Wrap a flag around a napkin! The flag napkin ring! 


rope around pot

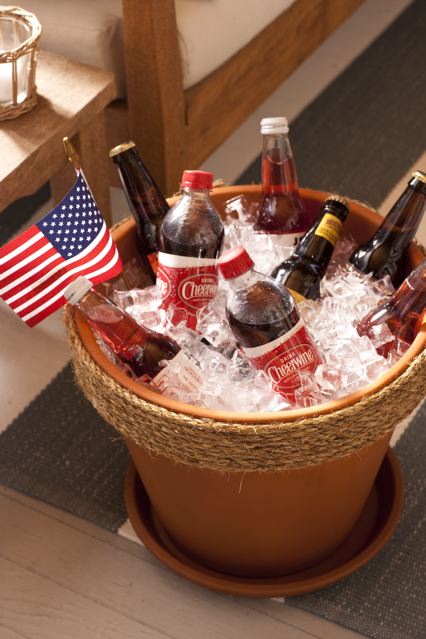
Turn a large terra cotta pot into a ice cooler. Glue gun on yardage of roping to make it special,
 fill with ice!


Angel Food cake

Little toothpick flags turn any store bought or home made cake into a red, white, and blue  party cake in seconds.


Licorace 4th of July

Place assorted glass cookie jars, and fill them with summer treats for your guests.

Red white and blue water bottle, Remove lables: Wrap water bottle with small flags, use double stick tape down the back to hold.


summer mantel


scatter collections of canning jars filled with flowers and flags , how easy is that

birthday treats

Treat pails: Each guest gets a different number.  You can find adhesive numbers at Loews.


Monday, July 2, 2012

Styling A BH&G Star Spangled Holiday


Last summer I was lucky enough to be asked to travel to Beaufort, North Carolina with a crew from Better Homes and Gardens magazine to style the Fourth of July feature that is running this month in the July 2012 issue.

The best part was the great opportunity to meet and work with fellow field editor Lisa Mowry, editor Amy Panos and photographer John Bessler.  The story was shot last September, just after the hurricane swept up the east coast, so of course I was worried about the damage the hurricane was capable of inflicting down south. Luckily, the house was safe from the storm and the shoot was a go!

This was a really fun and exciting project for me to style. The challenge was to combine a nautical theme with a July 4th, red, white, and blue overlay throughout the home and the festivities. Every detail of each shot had to planned and organized ahead.

I arrived at the location with my assistant Monica and a van of  props and materials we had gathered from near and far.  We immediately got to work prepping and styling with a highly enthusiastic and energetic group.  Over a period of three days, pushing 12 hours days with meals on the fly, we cranked out a very productive and successful feature and managed to have some really good fun doing it. 

I’d love to share the feature with you, enjoy!