lidbeckbrent

lidbeckbrent

Tuesday, March 26, 2013

Flower Show Centerpiece: Styling An Easter Table


Styling An Easter Table 
Inviting friends and family to our Easter table is the 
highlight of my Easter Holiday Celebration.

 The Easter Holiday centerpiece pictured below is one I created for next month's April, Good Housekeeping Magazine. It is an arrangement of decorated eggs with readily available Spring flowers. I used soft pinks and blush colors of peach stock, white hyacinth, coral sweetpea and soft pink tulips.

Collecting the simple mismatched vintage milkglass containers for the vases was so much fun. I found them all at local antique markets and shops. Fill each vase with floral foam before adding flowers.


Photo by Michael Partenio
 The table's overall pink hue with colored plates of hot of aqua blue creates a wonderful Easter pallette. I like to make my table runners from yardage bought at my favorite fabric store.  That way I can make inexpensive runners at lengths long enough to run over the ends of the table.  I layered two shades of pink runners: one measuring 16" wide, and another wider runner underneath at 24" wide.  If I have time, I hem the runners.

Here's a time-saving tip: just iron the edges under and use iron-on hem tape for a quick fix!

Photo by Michael Partenio
Adding real eggs to this pretty arrangement is a surprising element. The eggs are glued to shish-kabab spears and added as if they were flowers. 

Here is a simple way to add real eggs 
into your arrangements:

What you will need:
- Brown and white eggs (duck, quail, goose or chicken eggs will work)
- Glue gun
- Wooden shish-kabob spears available at your grocery store.

1. Using a small knife or sharp object, poke a hole into the wide end of the egg. Use the knife to enlarge the hole to 1/2".  Use one end of a wood spear to stir egg inside and help force it out of the egg by breaking the yoke. Then shake the egg to remove yolk. It can be stubborn but it will eventually flow out. Using your wooden spear, push a small piece of paper towel inside the egg to wipe and dry clean.


2. Use your glue gun to place a large blob of glue on the flat end of spear.


3. Place glued spear into egg until it rests against the inside bottom. Place large amount of glue on spear where it meets the egg at opening.  Let dry.  The bottom of the egg wil be hidden by the flowers so don't worry about any unsightlyness!


Hint: The small speckled blue eggs on the table pictured above are artifical and from my local craft store. If you can find large artificial eggs at the craft store that have foam centers, the pointed end of the spear can be pushed into the egg. Now you have an even faster application of eggs to add to your Easter Flower Show arrangment.

Thursday, March 21, 2013

A Child's Easter Table: Daisy Eggs & Jelly Beans

A Child's Easter Table: 
Daisy Eggs & Jelly Beans  
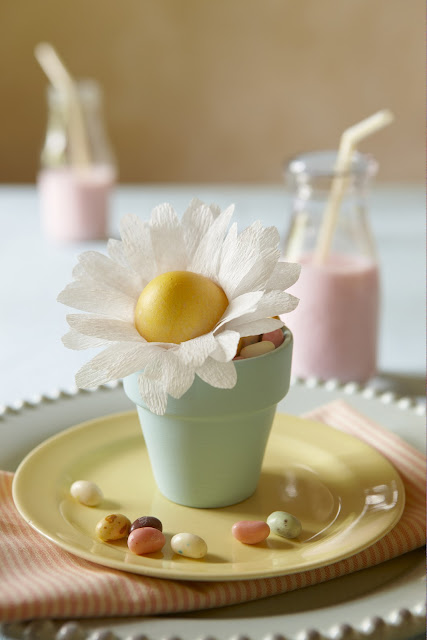
Crepe Paper + Easter egg + Jelly Beans = A Super Fun Place Setting

Creating Easter craft projects for kids has always been my favorite part
of the holiday. Making a special place at the Easter Table is top on my list
as a must do.  A little extra effort can make your holiday memorable for
everyone, so let's get started creating this fun Easter Place Setting!
Karin Lidbeck
Photo by Michael Partenio
Wait til you see how easy it is to make this Daisy Egg


What You'll Need:
1- Roll of White Crepe Paper (Available At The PartyStore)
2- Double Stick Tape
3- Scissors
4- Pencil
5- One Dyed Egg - Use Eggs Your Kids Dyed!

Easter

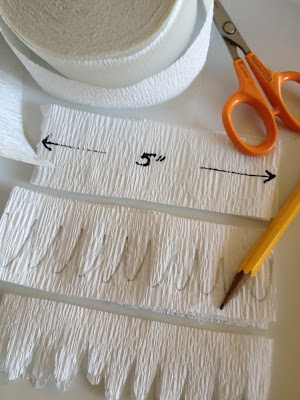
1. Cut crepe paper to 15" length and fold over to make 3 layers @ 5" wide

2. Using a pencil draw daisy petals across the crepe paper. 
Keep petals 1/4 " from bottom edge.

3.  Cut out our daisy pattern.

Add caption
4. Dye one hard boiled egg yellow for each egg daisy.

5. Wrap double sided tape around the middle of the egg.

Starting along the top edge of the double sided tape, wrap the crepe paper 
around the egg while adhering to the tape as you circle egg.


Pull out petals and then push the egg into a 3" painted pot, or a 
plain terracotta pot filled with Jelly Beans.

Place potted Daisy Egg onto each plate!


Tuesday, March 19, 2013

Watercolor Easter Eggs: Using A Paintbrush Techinique

Watercolor Easter Eggs: 
Using A Paintbrush Technique

Find your Inner Artist- Artful eggs

 If you're like me, always on the lookout for a new Easter-egg decorating technique, you will enoy the creative freedom you'll get from this technique:

Using a paint brush and watercolors, brush the color over the egg with a few simple brush storkes and then let the color do its own thing. The color will run, bleed and fade while drying.  That's what watecolors do.

Experiment while you create. Be artistic!

Photo credit: Michael Partenio

I developed this egg decorating project for Good Housekeeping magazine last Spring 
while working on concepts for our Easter photo-shoot. Brushstrokes of a variety 
of color mixed with water envoke a pretty pastel appearence.

Materials:
Tubes of water color paint in red, orange and yellow
3 bowls of water
3 small soft, pointed round brushes
White hardboiled eggs dyed in soft colors of pastel pink and yellow
Egg carton for drying eggs

In each bowl, mix approximately 1/2 inch blob of pigment with 
1/2 cup of water while disolving all of the pigment.


Using one color at a time, simply brush the color over and around the egg with one simple stroke. Then add another brushstroke of your next color, in another direction, until you have added 3, 4 or 5 storkes. The colors will bleed and run into each another while fading.  Place the egg into the carton to dry.

A large amount of eggs makes the most impact!

 Your studio might not look as chaotic as mine (above) but, experimenting is part of the creative process. Should you not like your design as you develop your technique, you can 
wash off the egg before it dries completely. Then wipe with a paper towel and start again.


For more Easter decorating ideas, grab a copy of Good Housekeeping April 2013 on the stands! 


Celebrate With Spring's Blooming Branches

Celebrate With Spring's Blooming Branches

Spring's glorious display of blooming branches is apon us! Cherry, Quince, Dogwood, Apple and  Forsythia are all coming our way! I'm so ready for the Spring season!

I'm anxiously waiting for my 'Spring Floral Arrangment' story to debut in the current Spring 2013 BH&G Country Gardens Magazine.  It talks about designing Spring bouquets in vintage watering cans.

In the very near future I will share this feature with you and post about displaying and forcing Spring's blooming branches. It's a sure way to celebrate and encourage an early Spring. Stay tuned and check back in this month.
 

A sneak peek showing a glorious variety of flowering 
branches form my photo`shoot last spring! Don't you love the color of these flowers on this green table?

Thursday, March 14, 2013

Kids Crafts- Make a Marshmallow Bunny

When my kids were young I designed many holiday craft projects for Parents magazine.  As a Mom, I  loved designing children's projects, since it involved my children. They were always willing guinea pigs!

Favorite projects were often ones that involved food, like this marshmallow bunny. If your children are old enough to pierce candies with toothpicks, this is a fun project to make with them.
Marshmellow Bunny 
Gather:
Large Marshmallows
Small pastel colored marshmallows
Smallest size cupcake  or muffin paper


Fruit by the foot, unroll and cut with small scissors to make buttons and boys bow tie
Small cookie and cake decorations can be used as decorations too!

Toothpicks

Use small tubes of white cake icing  to adhere candy dots like glue!

Assemble body parts with toothpicks (the toothpicks push through the paper, too!)

Have bowls on hand with a variety of other candies like gumdrops and jelly beans. Kids are great at coming up with all kinds of ingenious creations.

Enjoy the fun!

Thursday, March 7, 2013

Replace your Spring Wreath with a unique Basket Idea

Beckon Spring to your doorstep:
Assemble this "Homage-To-Nature Basket'!

 Several years ago, and in celebration of the eagerly awaited spring season, I designed   this bushel basket door project for the Good Housekeeping's Easter feature. I was so excited about creating this design as I had never seen this done before. And, its so simple! It opens up so many possibilites for creating your own natural display.  Add any natural elements you find in the store or in your garden! Plan ahead,... The  basic basket is easy to order online!

Read below to see how you can jump in and make one too. It may look challenging, but the happy surprise is… it's not! Planning a shopping trip to collect the materials will be your only challenge, and that is the fun part.


All photos by Michael Partenio

                 Enter Spring!                 

Materials Needed:
-    (1) 15" wide 'big squat round bottom basket' from Crate & Basket:
         http://www.crateandbasket.com/big-squat_1017_p.aspx
        Phone: 1-800 223 7823 
-      (1) Bag of Green Moss (Spanish moss)
-      Small 6” Birds Nest
-      Faux Eggs
-      Small Bird
-      Pussy Willow Branches

-       Glue gun


5 Easy Steps:
1- So you can hang your basket to your front door, use your glue gun to attach a wire to the top of the    back side of the basket.
2- To create your diorama, glue layers of moss starting in the bottom of basket, filling the basket from front to back.  Build moss up slightly higher on left-hand side. 
3- Glue bird’s nest to moss on left-hand side and on top of the moss (see picture below).  Hint:  Cut a piece of cardboard from any household box and use to help adhere the underside of the bird’s nest to the back of the basket for additional support.
4- Add small branches of pussy-willow along with a small branch you can break off from a tree limb.
5- Attach the bird.

OK, get going! You can do this, and make it your own!  Hang it on the front door, inside the house or even over the fireplace mantle!!

By, the way, the pansies are fresh picked from the garden and will stay fresh for a few days , believe it or not, with a light mist of water daily on the moss!

Lets Celebrate!   Spring is almost here.